Next.js 官网:https://nextjs.org/ https://nextjs.org/docs https://github.com/vercel/next.js
0x00 Next.js:React 开发框架
Next.js是一个 React 开发框架,用于构建 React 应用程序用,特性如下:
文件系统路由: Next.js 使用文件系统来自动化路由的创建。你只需要在 pages 目录下创建文件,它就会自动映射为相应的路由,不需要额外的路由配置。静态生成(SSG)与服务端渲染(SSR): Next.js 支持这两种渲染方式,可以根据需要灵活选择。静态生成适用于大多数情况,尤其是内容不会频繁变化的页面,而 SSR 适用于需要动态获取数据的页面。API 路由: Next.js 允许你在应用中直接创建 API 路由,可以在 pages/api 目录下轻松创建后端 API 端点,处理前后端逻辑。自动代码拆分: 每个页面只会加载它所需的 JavaScript 代码,确保应用启动速度更快,减少不必要的资源消耗。优化图片: Next.js 内置了图片优化功能,使用 next/image 组件可以自动为图像选择最佳格式、压缩、懒加载等,以提升页面加载性能。支持 TypeScript: Next.js 默认支持 TypeScript,可以让开发者在开发过程中享受更强的类型检查。
反正前端找工作不得不学…
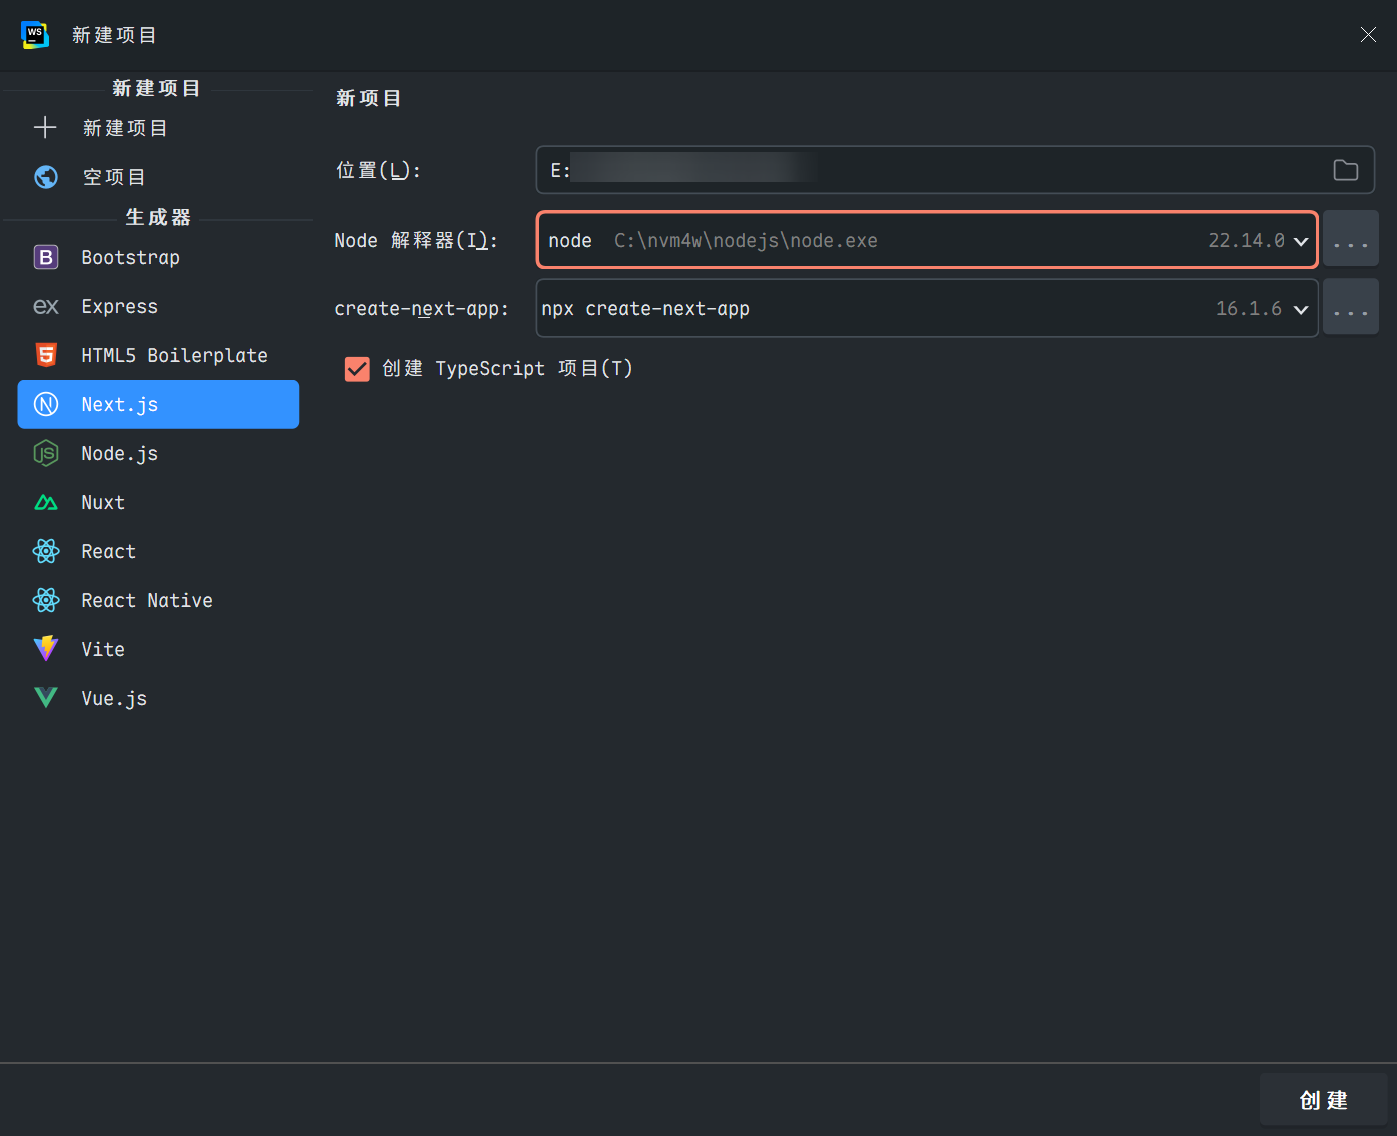
0x01 创建Next.js项目及相关配置 项目初建 在Webstrom中利用脚手架先创建项目:
过程如下:
1
2
3
4
5
6
7
8
9
10
11
12
13
14
15
16
17
18
19
20
21
22
23
24
25
26
27
28
29
30
31
32
33
34
35
36
37
38
39
40
41
42
43
44
45
C:\nvm4w\nodejs\npx.cmd --yes create-next-app"@latest" . --tsalias (`@/*` by default)? ... No / Yesalias would you like configured? ... @/*in E:\TsetRange9\next_0128.in 28sfor fundingfor details
过程中的一些交互式配置问题:
React Compiler :启用 React 官方的实验性编译器(优化性能)Tailwind CSS :集成流行的原子化 CSS 框架,便于快速样式开发src/ directory :将代码放在 src/ 文件夹中(推荐的结构化方式)App Router :使用 Next.js 13+ 的新路由系统(基于 app/ 目录,推荐)Import alias :配置路径别名(如 @/components),默认 @/*自动初始化 Git 仓库,并创建初始 commit
1
2
Success! Created next_0128 at E:\TsetRange9\next_0128
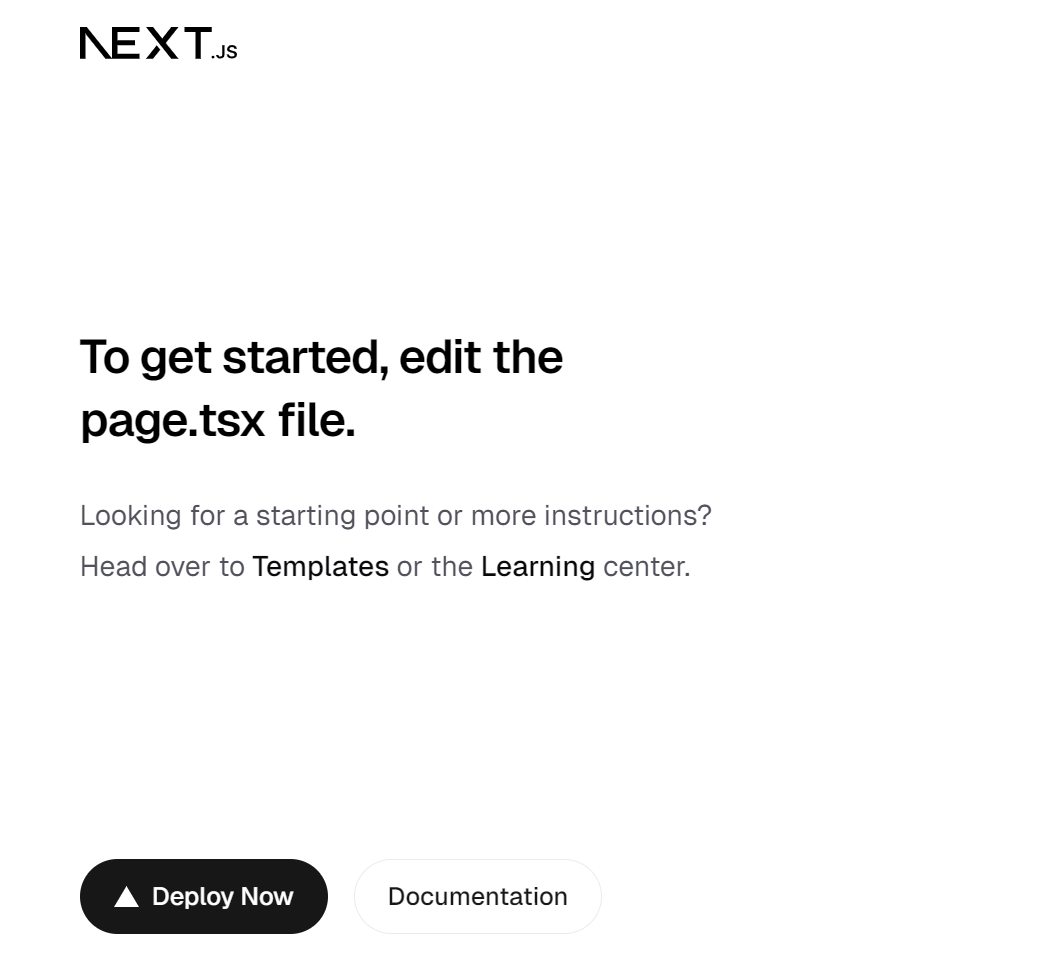
项目创建成功后,接下来进入目录运行 npm run dev 启动开发服务器http://localhost:3000 )
代码质量工具ESlint,Stylelint,Prettier和CommitLint 关于ESlint ESLint 是一个可配置的 JavaScript 检查器。它可以帮助你发现并修复 JavaScript 代码中的问题。问题可以指潜在的运行时漏洞、未使用最佳实践、风格问题等。
参考:ESLint 入门 - ESLint - 插件化的 JavaScript 代码检查工具
创建项目后,目录下有文件 eslint.config.mjs,直接进行对应的配置
1
2
3
4
5
6
7
8
9
10
11
12
13
14
15
16
17
18
19
20
21
22
23
24
25
26
27
28
29
30
31
32
33
34
35
36
37
38
39
40
41
42
43
44
45
46
47
48
49
50
51
52
53
54
55
56
57
58
59
60
61
62
63
64
65
66
67
68
69
70
71
72
73
74
75
76
77
78
79
80
81
82
83
84
85
86
87
88
89
import { dirname } from "path" ;import { fileURLToPath } from "url" ;import { FlatCompat } from "@eslint/eslintrc" ;import tseslint from "typescript-eslint" ;import prettierConfig from "eslint-config-prettier" ;import prettierPlugin from "eslint-plugin-prettier" ;import unusedImportsPlugin from "eslint-plugin-unused-imports" ;const **filename = fileURLToPath (import .meta .url );const **dirname = dirname (\_\_filename);const compat = new FlatCompat ({baseDirectory : \_\_dirname, export default tseslint.config (extends ("next/core-web-vitals" , "next/typescript" ),configs .recommended ,plugins : {prettier : prettierPlugin, "unused-imports" : unusedImportsPlugin, rules : {"import/default" : 0 ,"import/no-named-as-default-member" : 0 ,"no-unused-vars" : "off" ,"react/react-in-jsx-scope" : "off" ,"@typescript-eslint/ban-ts-comment" : "off" ,"unused-imports/no-unused-imports" : "warn" ,"react/prop-types" : "off" ,"prettier/prettier" : "error" ,"no-console" : "warn" ,"@typescript-eslint/no-unused-vars" : "warn" ,"@typescript-eslint/no-explicit-any" : "warn" ,ignores : [".next/**" , "out/**" , "build/**" , "next-env.d.ts" , "node_modules/**" , "**/*.mjs" , "**/*.min.js" ,
关于Stylelint Stylelint 是一个强大、先进的 CSS 代码检查器(linter),可以帮助规避 CSS 代码中的错误并保持一致的编码风格。
安装 Stylelint 并创建配置:
1
2
3
4
在项目根目录下创建 .stylelintrc.mjs 文件,并添加以下内容:
1 2 3 4 5 6 7 8 9 10 11 12 13 14 15 16 17 18 19 20 21 22 23 24 25 26 27 28 29 30 31 32 33 34 35 36 37 38 39 40 41 42 43 44 45 46 47 48 49 50 51 52 53 54 55 56 57 58 59 60 61 62 63 64 export default {extends : ["stylelint-config-standard" ,"stylelint-config-recess-order" ,overrides : [files : ["**/*.{html,vue}" ],customSyntax : "postcss-html" ,files : ["**/*.{jsx,tsx}" ],customSyntax : "postcss-styled-syntax" , rules : {"color-function-notation" : "modern" ,"max-nesting-depth" : 3 ,"selector-pseudo-class-no-unknown" : [true ,ignorePseudoClasses : ["global" , "deep" , "slotted" ],"block-no-empty" : true ,"^[a-z]([a-z0-9-]+)?(__([a-z0-9]+))?(--([a-z0-9]+))?$" ,message : "Expected class selector to be BEM pattern" ,ignoreFiles : ["dist/**/*" , "node_modules/**/*" , "**/*.min.css" ],
在项目根目录下创建 .stylelintignore 文件,并添加以下内容:
格式化工具prettier 在前端工程化项目( React、Next.js、TypeScript 等大型团队项目)中,Prettier 被广泛用于强制代码格式一致性,避免风格争议。它是“opinionated”(有主见)的格式化工具,通常与 ESLint 结合使用(通过 eslint-config-prettier 关闭冲突规则),并通过 Husky + lint-staged 在 git commit 前自动格式化。
opinionated(主见性): 工具开发者预设了一套强烈的、特定的最佳实践和规则,用户配置选项较少,必须遵循这些预设方式
作为代码质量工具,会移除所有原始样式,并确保所有输出的代码符合一致的风格
安装
1
2
3
再创建一个 .prettierignore 文件,让 Prettier CLI 和编辑器知道哪些文件不需要格式化,随后运行
1
2
npx prettier . --check
--check 类似于 --write,但仅检查文件是否已格式化,而不是覆盖它们。prettier --write 和 prettier --check 是运行 Prettier 的最常见方法。
将格式化工具与编辑器集成参考: https://prettier.node.org.cn/docs/en/watching-files
关于CommitLint commitlint 是一个专为 Git 提交信息设计的语义化校验引擎,它通过可配置的规则集确保提交信息符合预定义的规范。
安装 commitlint 及其核心依赖:
1 npm install -D @commitlint/cli @commitlint/config-conventional
@commitlint/cli:命令行工具,负责解析参数和执行校验流程@commitlint/config-conventional:内置的 Conventional Commits 规范配置集
创建commitlint配置commitlint.config.js:
1 2 3 4 module .exports = {extends : ["@commitlint/config-conventional" ],
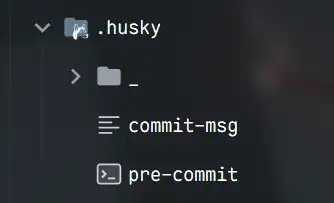
husky 与自动化提交检查 husky 是一个专为现代前端项目设计的 Git 钩子管理系统,它解决了传统 Git 钩子管理的诸多痛点
初始化:
这一步会创建 .husky 目录
安装 lint-staged来只检查暂存区的文件:
1 npm install --save-dev lint-staged
在 package.json 添加脚本:
1
2
3
4
5
6
7
8
9
10
11
12
13
14
15
"scripts" : { "dev" : "next dev" , "build" : "next build" , "start" : "next start" , "lint" : "eslint . && stylelint \"**/*.{css,scss,less}\"" , "lint:css" : "stylelint \"**/*.{css,scss,less}\"" , "lint:css:fix" : "stylelint --fix \"**/*.{css,scss,less}\"" , "lint:fix" : "eslint . --fix && stylelint --fix \"**/*.{css,scss,less}\"" , "format" : "prettier --write \"**/*.{js,jsx,ts,tsx,json,md,css}\"" , "format:check" : "prettier --check \"**/*.{js,jsx,ts,tsx,json,md,css}\"" , "prepare" : "husky" , "commitlint" : "commitlint --edit" , "precommit" : "lint-staged" }
结合 Husky + lint-staged(commit 前自动修复):package.json中添加 lint-staged配置:
1
2
3
4
5
6
7
8
9
10
11
12
13
14
15
16
17
18
19
20
21
{ "scripts" : { "dev" : "next dev" , "build" : "next build" , "start" : "next start" , "lint" : "eslint . && stylelint \"**/*.{css,scss,less}\"" , "lint:css" : "stylelint \"**/*.{css,scss,less}\"" , "lint:css:fix" : "stylelint --fix \"**/*.{css,scss,less}\"" , "lint:fix" : "eslint . --fix && stylelint --fix \"**/*.{css,scss,less}\"" , "format" : "prettier --write \"**/*.{js,jsx,ts,tsx,json,md,css}\"" , "format:check" : "prettier --check \"**/*.{js,jsx,ts,tsx,json,md,css}\"" , "prepare" : "husky" , "commitlint" : "commitlint --edit" , "precommit" : "lint-staged" } , "lint-staged" : { "*.{js,jsx,ts,tsx}" : [ "eslint --fix" , "prettier --write" ] , "*.{css,scss,less}" : [ "stylelint --fix" , "prettier --write" ] , "*.{json,md}" : [ "prettier --write" ] } }
配置自动化提交检查:在 .husky 目录中, pre-commit 和 commit-msg 钩子应该配置如下:(没有则创建)
1 2 3 4 $1
1
2
3
4
5
6
7
8
9
10
11
12
13
14
15
#!/bin/sh "$(dirname "$0 " ) /_/husky.sh" echo "开始代码检查..." if [ $? -ne 0 ]; then echo "代码检查未通过,请修复错误后重新提交" exit 1fi echo "代码检查通过"
配置后,在提交前会:
运行 ESLint 检查 JavaScript/TypeScript
运行 Stylelint 检查 CSS/SASS/LESS
运行 Prettier 格式化代码
只检查暂存区的文件,提高效率
自动修复可自动修复的问题,会重新提示暂存文件
在commitlint.config.js中配置的@commitlint/config-conventional,提交信息应该符合Conventional Commits规范,格式为:
1 2 3 <type > (<scope > ): <subject > <body > <footer >
其中,type是提交的类型,必须是以下之一:
feat: 新功能
fix: 修复bug
docs: 文档更新
style: 代码格式调整(不影响代码运行)
refactor: 重构
test: 测试相关
chore: 构建过程或辅助工具的变动
例如,一个简单的提交信息:
我们也可以自定义type Configuration | commitlint
devtools
Next.js 提供了强大的开发工具 DevTools,可以帮助开发者调试和优化应用程序。
Next.js 13+ 引入了内置的开发工具,可以通过在页面组件中添加特殊的注释来激活:
1 2 3 4 5 6 7 8 9 10 11 12 "use client" ;export default function MyComponent (return <div > {/* 你的组件内容 */}</div >
另外,Next.js DevTools 还包括:
React DevTools 集成 :可以直接在浏览器中检查 React 组件树性能分析工具 :帮助识别性能瓶颈路由分析器 :可视化路由结构和加载性能Bundle 分析器 :查看打包大小和依赖关系
页面和布局 Next.js 13+ 引入了 App Router,使用 app 目录结构:
1
2
3
4
5
6
7
8
9
10
11
12
13
14
15
16
app/
布局 (Layouts) 布局是跨多个页面共享的 UI,它们在路由更改时保持状态,允许在部分渲染之间进行转换。
1 2 3 4 5 6 7 8 9 10 11 12 export default function RootLayout ({ children, }: { children: React.ReactNode; } ) {return (<html lang ="en" > <body > {children}</body > </html >
页面 (Pages) 页面是路由段的具体 UI,用于展示独特内容。
1 2 3 4 export default function Page (return <div > Home Page</div >
数据获取 Next.js 提供了多种数据获取方法:
获取数据 (Fetching Data)
Static Generation (SSG) :构建时获取数据Server-side Rendering (SSR) :请求时获取数据Incremental Static Regeneration (ISR) :首次请求后按需更新
1 2 3 4 5 6 7 8 9 10 11 async function getData (const res = await fetch ("https://api.example.com/data" );return res.json ();export default async function Page (const data = await getData ();return <div > {data.title}</div >
API Routes Next.js 允许你创建 API 端点,只需在 app/api 目录下创建路由处理器:
1 2 3 4 export async function GET (request : Request return new Response ("Hello, Next.js!" );
中间件 (Middleware) 中间件允许在请求完成之前运行代码,可以修改传入的请求和响应。
1 2 3 4 5 6 7 8 9 10 11 export function middleware (request : NextRequest if (request.nextUrl .pathname .startsWith ("/admin" )) {return NextResponse .redirect (new URL ("/login" , request.url ));export const config = {matcher : ["/admin/:path*" , "/dashboard/:path*" ],
部署 Next.js 应用可以部署在各种平台上,包括 Vercel(Next.js 的创建者)、Netlify、AWS、Azure 等。
部署到 Vercel
将代码推送到 Git 仓库
在 Vercel 仪表板中导入项目
配置环境变量(如有必要)
部署完成!
性能优化 Next.js 提供了许多性能优化功能:
图片优化 使用内置的 Image 组件:
1
2
3
4
5
6
7
8
9
10
11
12
import Image from 'next/image' export default function Page (return (<Image src ="/me.png" height ={144} width ={144} alt ="Picture of the author" />
字体优化 使用内置的 Font 组件:
1
2
3
4
5
6
7
8
9
10
11
import { Inter } from 'next/font/google' const inter = Inter ({ subsets : ['latin' ] })export default function Layout ({ children }: { children: React.ReactNode } ) {return (<html className ={inter.className} > <body > {children}</body > </html >
动态导入 按需加载组件:
1
2
3
4
5
6
7
8
9
10
11
12
import dynamic from 'next/dynamic' const DynamicComponent = dynamic (() => import ('../components/hello' ))export default function Home (return (<div > <Header /> <DynamicComponent /> </div >
参考